Wednesday, January 27, 2010

Jungle Bamboo Cloth

I’ve been teaching myself a number of new knitting stitches lately, and the bamboo stitch looked like it produces a lovely texture without being particularly difficult. I couldn’t, however, find a dishcloth pattern to learn the stitch on. So, I made up my own and it worked.

So I proudly present my first dishcloth design.

Jungle Bamboo Cloth
Free pattern (for personal use only).

Materials:
  • US 7 / 4.5 mm knitting needles

  • Georga Cotton from Easy Knit Yarn: Jungle

  • Tapestry needle


Instructions:

Cast on 38 stitches.

Rows 1-6: K (produces a garter stitch border)

Begin bamboo stitch pattern:
Row 7: K4, P30, K4
Row 8: K4, *YO, K2, Pass the YO strand over both knit stitches* repeat 15 times, K4

Repeat Rows 7-8 seventeen times

Row 9: Repeat Row 7

Rows 10-15: K

Bind off and weave in ends.

Note that the reverse side has an interesting pattern as well.

© 2010-01-27 N0Nightowl

Monday, January 18, 2010

Wine-Twist Winter Accessories

The name for this set of knitted items comes from the colourway of the yarn, Wine-Twist from Bernat Super Value Ombres. I fell in love with the jewel-toned hues, and even though I had nothing particular in mind at the time, I just knew I had to do something with it.


I started with a scarf using the drop stitch, which I had just started to teach myself at the beginning of July. I chose this as my knitting project for attending the Polaris Con because it was so easily – I just had to keep track of four rows, so I could easily knit while listening to the speakers. Got most of it done at the con.

Wine-Twist Drop-Stitch Scarf
Free pattern (for personal use only).

Materials:
  • US 6 / 4.0 mm knitting needles

  • 1 skein Bernat Super Value Ombres Wine-Twist worsted-weight yarn

  • Tapestry needle

Instructions:

Cast on 24 stitches.

Rows 1-8 K (produces a garter stitch border)

Begin drop stitch pattern:
Row 1: K
Row 2: Knit each stitch, wrapping the yarn around the needle twice instead of once when completing the stitch
Row 3: Knit each stitch, dropping the extra wrap off the needle as you complete each stitch
Row 4: K

Repeat these four rows until there is just enough yarn left to create an 8-row border in garter stitch (K all sts).

Bind off and weave in ends.

© 2010-01-18 N0Nightowl

Wine-Twist Mittens

After completing the scarf, I used my favourite mittens pattern (Patons No. 303, Beehive Publications (from the 1970's)) for the second skein of Wine-Twist yarn I had originally purchased. Unfortunately, I cannot tell you where to find this pattern, as it appears to no longer be in publication.

After completing the mittens, there was enough yarn left over in the skein to do a matching cloche, to complete the 3-piece set.

Wine-Twist Cloche with Flower Decoration
Free pattern (for personal use only).

Technique: French Knitting, also know as looming or spooling, used for the cloche, and regular single-pointed needle knitting for the attached flower.

Materials:
  • Provocraft Knifty Knitter Round Loom -- green for small-adult size or yellow for large-adult size

  • Knifty Knitter Hook

  • US 6 / 4.0 mm knitting needles

  • 1/2 skein Bernat Super Value Ombres Wine-Twist worsted-weight yarn

  • Large metal button, preferably gold-coloured, with a shank on the back instead of button holes (the one I used was recycled from an old worn-out jacket)

  • Tapestry needle

Instructions:

Actually, the instructions for this project are very simple, because I am just going to tell you to merge two free patterns by different folks.

Step 1: Make the rolled-brim basic cloche following the instructions that come with the round Knifty Knitter looms.

Step 2: Make a Lydia Flower, which is a free pattern from the Lazykate website. I tried to follow the pattern, but just couldn’t get it right to save my life (the number of stitches simply would not match up!), so I ended up adapting it to what worked for me. It looked best using two knit ruffle rounds rather than the three in the pattern. Also, my stitches looked ragged in the centre compared to Kate’s example.

Step 3: Sew the button to the flower and then the flower to the hat at a jaunty angle.

© 2010-01-18 N0Nightowl

Friday, January 15, 2010

Warm Scarf with Fuzzy Tips

Free pattern (for personal use only).

After an unusually warm fall, it's been a very cold winter in Toronto this year. My friend Hauntfox, for whom I made the Fuzzy Headband I blogged about in November, came to me shivering in December and asked if I could make her a nice light but really warm scarf like the pink one I did back in the summer when I was learning how to use the Provocraft long looms... and no, I never did get around to writing that up.

Here’s a picture of the original scarf, produced following the instructions that come with the long loom set. Note that this is double-knitting, which produces a bulky but extremely lightweight flat panel that is reversible. I made one modification to the base pattern, because casting off according to the instructions resulted in one end’s being much tighter than the other. Luckily, the ladies from the Yahoo Frame_Knitting Group I belong to gave me a solution, which was to replace the beginning loops back on the loom and then cast them off with the yarn tail the way the finishing end had been cast off.

This new scarf is incredibly simple to make, but looks quite impressive because of the richness of the boa texture at each end.

Technique: French Knitting, also known as loom knitting or spooling

Materials:
Instructions:

Step 1: Using a strand each of the boa and the worsted-weight yarn held together, cast on using the figure eight wrap method and loom for 3 inches.

Step 2: Cut the boa strand, leaving a 7-8 inch tail, which you will weave in later. Do not cut the worsted-weight yarn.

Step 3: Add a second strand of the worsted-weight yarn and continue looming (each loop will be composed of two strands), until the scarf is the height of the person for whom it is being knit.

Step 4: Cut one of the worsted-weight strands, leaving a 7-8 inch tail to weave in later.

Step 5: Add a strand of the boa, and holding it together with the uncut worsted-weight yarn, loom for 3 more inches.

Step 6: Cast off with a crochet hook.

Note that the use of the fuzzy boa yarn means that both ends look practically the same, so there is no need to re-cast-off the beginning the way it was with the pink scarf, which was knit with a single strand of worsted-weight yarn only.


© 2010-01-10 N0Nightowl

Friday, January 8, 2010

New Year's Catch-Up and Demonic Lengths Scarf

Everyone keeps asking what was my New Year's Resolution, but I didn't make one this year. The usual "lose weight" is not available as a resolution this year. Since I was diagnosed as diabetic two months ago, weight loss is no longer optional -- it's mandatory. I'm simply counting calories, with the understanding that I'll be counting calories for the rest of my life. Once I lose all that I need to (23 pounds down, 77 pounds to go), I'll switch to maintenance calorie-counting. From past yoyo dieting, I know myself and recognize the fact that I'll never again be able to "eat normally", because, for me, eating normally means consuming comfort foods, and these are almost all high in calories, fats and carbs. [sigh] If I allow myself the least leeway, I'll fall back into temptation and the usual "just this once won't hurt", spiralling into multiple "once's" and the weight's piling back on. Hence, calorie counting will now be enforced for the rest of my life.

So, that left me searching for a new New Year's Resolution. Then I realized how far I am behind in getting all my projects and patterns posted to this blog. Well, folks, I am resolved to catch up.

I'm going to start with the long overdue pattern for the scarf that completes my Supernatural winter accessories set. I posted the pattern for the Demonic Thoughts Tuque back in July and the matching Demonic Hands Mitts project in August.


Demonic Lengths Scarf

Free pattern (for personal use only).

This short, sassy scarf knits up quickly and makes the perfect match for the accompanying tuque and mitts. The vivid red made these the perfect accessories for the just-past holiday period, and I received lots of compliments every time I wore them.

Materials:


  • 1 ball Bernat Boa Cardinal eyelash yarn


  • 1 ball Red Heart Classic Cherry Red worsted-weight acrylic yarn


  • 4 mm knitting needles


  • 4.5 mm knitting needles


  • Tapestry needle

Instructions:

Holding together one strand of the Boa and one strand of the worsted-weight yarn, cast on 17 sts using the 4 mm knitting needles.

Knit 8 rows in single ribbing:
Odd rows: *K1 P1* repeat to end of row
Even rows: *P1 K1* repeat to end of row.

Cut off Boa, leaving a tail to weave in at the finishing stage.

Change to the 4.5 mm knitting needles and continue knitting with a single strand using the seed stitch.

All rows: *K1 P1* repeat to end of row.

When the scarf reaches 36 inches long, add a strand of the Boa to the worsted-weight yarn and switch back to the 4 mm needles.

Knit 8 rows in single ribbing, as above.

Cast off.

Finishing: Weave in the yarn tails and block the scarf.

Note: Normally, the addition of the Boa strand for the cuffs would cause them to be wider than the body of the scarf. Using the smaller needs and rib stitch should make them the same width as the scarf body. If not, even up the width when you block the scarf.

Below is a picture of all three items in the Supernatural winter accessory set.


© 2010-01-07 N0Nightowl

Sunday, December 27, 2009

More Christmas Projects

Once I completed the unfinished Honey in the Comb Christmas dishcloth that I'd started last year, I found myself on a roll. I love the vivid colours of holiday yarn, and the untouched skein of Bernat Handicrafter Holidays Ombres Mistletoe in my stash just kept calling out to me.

Mistletoe iCord Necklace
Free pattern (for personal use only).

I started my holiday knitting binge by making iCord necklaces to gift my friends at our annual Christmas party. The necklaces turned out to be very popular.

Materials:

  • 1 ball of Bernat Handicrafter Holidays Ombres yarn in Mistletoe Ombre

  • preferred tools for making iCord (knitting needles, loom or French Knitting Bee – personally, I prefer the French Knitting Bee)

  • tapestry needle

  • small Christmas ornaments (I used the handmade glass pendants from a set of wine-glass identifiers)

Instructions:

Create an iCord 26-28 inches long using your preferred method of making iCord.

Sew the two ends of the iCord together and weave in the tails.

On the side of the loop directly opposite where you sewed the ends together, sew on one of your holiday ornaments. Be sure the ornament is heavy enough to hang properly without being so big or heavy that it weighs the neck down.

The example in the photo is a hand-formed glass candy cane.

Tie a piece of contrasting yarn around the sewing to hide it and make a bow to dress up the pendant.

Mistletoe Lily Dish Cloth
I used the free Lily Knitted Dish Cloth pattern from the Dishcloth Boutique. Actually, started it in a Handicrafter Twist, using the 4.5 mm needles called for. I was well into the project before I realized how incredibly wide the dishcloth was turning out. Then I messed up (knitted half of one row of instructions and then the other half of a different row). I only made matters worse when I tried to pick it out, so I unravelled the whole thing. At that point, I decided to change to the Mistletoe yarn, since there seemed to be plenty left in the skein after I finished the iCord necklaces. I also changed to smaller needles (3.25 mm). Finally, I wrote out the instructions in detail (no repeats), so that I could tick everything off as I went and not mix up the row instructions.

Oops. I guessed wrong about the amount of yarn left. I ran short after finishing the pattern, but with 12 rows still to go. I was just about to take apart the last necklace (the friend I’d made it for missed the party) in order to finish the dishcloth, when another friend called out of the thin blue air asking if I wanted to go with her to Walmart (way, way out in the suburbs) that Saturday. Since that’s where the Mistletoe yarn came from, I crossed my fingers and hoped I’d find another ball of it there, so that I could finish the dishcloth without having to undo the necklace… and sure enough, they did! [Happy Dance!]

It came out beautifully, don’t you think? I actually like the reverse side better than the actual front.

Mistletoe Christmas Tree Hot Pad

So, once more I had lots of holiday yarn leftover. This time I decided to do the free Christmas Tree Dish Cloth pattern by Barbara Breiter. To my surprise, when I knitted it up, it was way too small to be a dishcloth despite the pattern’s name and despite using large needles. So, I’ll be using it as a hot pad for holiday dinners.

© 2009-12-27 N0Nightowl

Monday, December 14, 2009

Honey in the Comb Dishcloth

In addition to the Mistletoe Dishcloth that I found in my stored Christmas decorations, I also found a second half-finished dishcloth that I am referring to as "Honey in the Comb" because it's knit using the honeycomb stitch.

Basically, this dishcloth follows the Honeycomb pattern in Sandy Scoville's Knit Dishcloth Sampler (American School of Needlework, publication #1309), except I used two colours instead of one. Why? Because last year I had leftover both mistletoe yarn (from the Mistletoe Dishcloth) and red yarn from a dishcloth that I had done for a friend with a kitchen decorated in red. Neither leftover was enough to make a dishcloth, but the two together produced this lovely Christmas kitchen accessory. I simply used the red for the border in the pattern and the mistletoe for the centre.

I'm still trying to conquer joining two colours cleanly. This was the first time I managed to do it without leaving any holes, but the joins aren’t always clean, plus I made one major booboo. Instead of running the change-over yarn back through the body of the knitting, I accidentally looped it around the outside. Oops! By the time I noticed the problem, I wasn’t in the mood to unravel all my knitting. Since I was doing this dishcloth for me and not as a present for someone else, I decided to leave it as it was.

My Honey in the Comb Dishcloth now makes a striking Christmas decoration hanging above my kitchen sink.

Wednesday, December 9, 2009

Tasselled and Warm

Free pattern (for personal use only).

A friend gifted me with some lovely silvery-grey yarn, and I knew I had to turn it into a winter hat. I decided to take the basic concept of my pattern for my Demonic Thoughts Tuque and adapt it to something slightly warmer for Canadian winters. The original tuque was done in traditional loom-knitting e-wrap (also known as single stitch), which leaves a somewhat airy result. I’ve since learned that the double stitch produces a tighter, thicker finish.

This hat is incredibly simple to make, but looks quite impressive because of the richness of the boa texture of the brim and the addition of the tassel.

Technique: French Knitting, also known as loom knitting or spooling

Sizes: Small adult (with instructions between brackets for large adult)

Materials:
  • Knifty Knitter Round Loom -- green for small-adult size or yellow for large-adult size

  • Knifty Knitter Hook

  • 1 ball eyelash (boa) variegated yarn (I used a dollar-store generic eyelash yarn)

  • 1 ball worsted-weight yarn (this was an unlabelled gift, so I don’t know what brand it was)

  • Tapestry needle

  • Optional: French Knitting Bee


Instructions:

Step 1: Using a strand each of the eyelash and the worsted-weight yarn held together, e-wrap the loom three times counter-clockwise. There will be three loops on each peg when you are done.

Step 2: Using the hook that came with the loom kit, lift the bottom loop on each peg over the top two loops and over the peg (this is what is meant by "double stitch"). When you have completed the entire circle, you will have two rows of loops remaining on the pegs. Push these loops to the bottom of the pegs.

Step 3: E-wrap the loom. You should now have three loops on each peg once again.

Step 4: Repeat Step 2.

Continue repeating Steps 3 and 4 until your knitting measures 5.5 inches (6.5 inches) long.

Step 5: Cut the boa strand, leaving a 7-8 inch tail, which you will weave in later. Do not cut the two strands of worsted-weight yarn.

Step 6: Pull your knitting through the inside of the loom to access the beginning edge. Place each loop from the originating row over its corresponding peg (hint: start by placing the loop to the right of the original loose yarn over the peg to the right of the outer tie-off peg and continue around the circle counter-clockwise until you have two loops on each peg -- the bottom loop being from the last row you knit and the top loop being from the edge).

Step 7: Lift the bottom loop over the top loop and over the peg. When you have completed the entire circle, you will have one row of loops remaining on your pegs, and the bottom and top of your knitting will have been knit together to form a double-thick brim.

Continue repeating Steps 3 and 4 until your knitting measures 7.5 inches (8.5 inches) beyond the brim. There should be two loops on each peg at this point.

Step 8: Lift the bottom loop over the top loop, so that only one stitch remains on each peg.

Cut your yarn (both strands), leaving 7-8 inch tails.

Step 9: Thread your tapestry needle with a 2- to 2.5-foot length of the worsted-weight yarn. Sew through each loop on the pegs, from bottom to top of the peg. When all loops have been sewn through, join the ends of the sewing yarn with a slip knot.

Step 10: Using the hook, lift all the loops off the pegs. They will now be strung on the yarn you sewed through them with the tapestry needle.

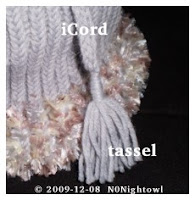
Step 11: Using your favourite technique for creating iCord, make a cord 6.5 (7.5) inches long, leaving a 3-ft. tail on end. Personally, I make my iCords using the French Knitting Bee. However, if you prefer to loom your iCord, click here for video instructions at the Knit Knot Purl Curl website.

Step 12: Make the tassel. Wrap a single strand of the worsted-weight around your hand until you get an amount of yarn that you think would make a nice thickness for your tassel. I wrapped my hand 9 times, which makes an 18-strand tassel. Using a 10-12 inch strand of yarn, tie one side of the loops together with a square knot.

Step 13: Attach the tassel to the end of the iCord with another square knot. Then use the long iCord tail to wrap tightly around the top part of the tassel and the bottom of the iCord. Complete by sewing down through the inside of the wrap and cut off the remaining end of the tail. Cut off the loops at the bottom of the tassel.

Step 14: Turn the hat inside out. Pull the two ends of the sewing yarn together to gather the material for the top of the hat. Before you have completely closed the top, slip through the opening the top end of the iCord.

Step 15: Tighten the sewing yarn until the hole at the top of the hat is completely closed and tie off with a square knot. Then tie one end of the sewing yarn to the tail of the iCord with a square knot. Tie all loose ends of yarn together with one more square knot.

Step 16: Cut the ends of all the yarn tails approximately one inch from the knots. Optionally, you can weave all the tails into the knitting instead of cutting, but I find that it's easier just to leave the short, cut strands as they are on the inside the tuque and cannot be seen.

Step 17: With the tapestry needle, weave in the tails of yarn on the inside of the tuque where the brim joins the top of the hat.

Step 18: Turn your hat right-side-out, and your project is complete.

© 2009-12-08 N0Nightowl